Missing Disk / Dismounting Diskgroup after duplicate from ASM to ACFS

Last week I was asked to create a Data Guard environment. Quite simple task, you may think. And actually it was, but with some funny side effects. The primary database is running on an Oracle Database Appliance X6-2M using ASM. The Standby database was planned to run on another ODA, a X5-2HA. The X5 is using pure ACFS. Both are running 12.1.0.2.170418 Bundlepatch. Be aware of that, the HA ODA’s are using PSUs whilst the smaller ones are using Bundlepatches. You should not mix up these, so I created another DB Home on the HA with the propper Bundlepatch. With the January ODA Update for the HA versions, Oracle moved to Bundlepatches too, but we are not yet there. So that’s it for the sake of completeness.

So what I did obviously in the first place was duplicating the primary database to the HA ODA. Once that was finished, I wanted to clean up the controlfile and get rid of all those backup and archivelog records and keep just the ones that are really available.

oracle@odax51 ~]$ rman target /

Recovery Manager: Release 12.1.0.2.0 - Production on Fri Mar 16 09:11:42 2018

Copyright (c) 1982, 2014, Oracle and/or its affiliates.  All rights reserved.

connected to target database: COMA (DBID=1562414168, not open)

RMAN> catalog db_recovery_file_dest;

Starting implicit crosscheck backup at 2018-03-16 09:11:44
using target database control file instead of recovery catalog
allocated channel: ORA_DISK_1
allocated channel: ORA_DISK_2
allocated channel: ORA_DISK_3
allocated channel: ORA_DISK_4
allocated channel: ORA_DISK_5
allocated channel: ORA_DISK_6
allocated channel: ORA_DISK_7
allocated channel: ORA_DISK_8

At this point the RMAN was stuck. A quick look in the alert.log revealed a whole bunch of messages like these:

2018-03-16 09:08:32.000000 +01:00
WARNING: ASMB force dismounting group 3 (RECO) due to missing disks
SUCCESS: diskgroup RECO was dismounted
NOTE: ASMB mounting group 3 (RECO)
NOTE: ASM background process initiating disk discovery for grp 3 (reqid:0)
WARNING: group 3 (RECO) has missing disks
ORA-15040: diskgroup is incomplete
WARNING: group 3 is being dismounted.

The ASM alert.log had corresponding messages:

2018-03-16 09:11:48.567000 +01:00
NOTE: client COMA1:COMA:odax5-c dismounting group 3 (RECO)

Oh sh… you might think, and that was exactly what I thought at that time. So I checked the ASM diskgroups, disks etc. but did not find anything that could be a problem.

So after a while of thinking, the idea came up that it might be related to the backup stuff in the controlfile. So I checked that and tried to unregister a backupiece manually. I used the undocumented DBMS_BACKUP_RESTORE package for that, so do this at your own risk.

SQL> select RECID, STAMP, SET_STAMP, SET_COUNT, HANDLE, PIECE# from v$backup_piece
2 where handle like '+%' and rownum=1;


    RECID      STAMP  SET_STAMP  SET_COUNT PIECE# HANDLE
--------- ---------- ---------- ---------- ------ ----------------------------------------------------------------------------
   129941  969656433  969656431     130820      7 +RECO/COMAX6/BACKUPSET/2018_03_01/nnndn1_tag20180301t210006_0.2815.969656433

SQL> exec dbms_backup_restore.changebackuppiece( -
2      recid => 129941, -
3      stamp => 969656433, -
4      set_stamp => 969656431, -
5      set_count => 130820, -
6      pieceno => 7, -
7      handle => '+RECO/COMAX6/BACKUPSET/2018_03_01/nnndn1_tag20180301t210006_0.2815.969656433', -
8      status => 'D' -
9	);

During the PL/SQL call I saw exact one message like the ones above in the alert.log. That explains te behaviour. During the “catalog” call from RMAN, an implicit crosscheck takes place. Since this tries to access the files in the RECO diskgroup and there is really nothing in that diskgroup except an ACFS volume, this error is being thrown.

That means, I need to get rid of all these records. A simple PL/SQL block helped me doing that.

SQL> set serveroutput on 
SQL> begin
2  for rec in (select RECID, STAMP, SET_STAMP, SET_COUNT, HANDLE, PIECE# 
3              from v$backup_piece 
4			  where HANDLE like '+%'
5  ) loop 
6    dbms_output.put_line('deleting ''' ||rec.handle);
7    dbms_backup_restore.changebackuppiece( 
8       recid => rec.recid,
9       stamp => rec.stamp, 
10      set_stamp => rec.set_stamp,
11      set_count => rec.set_count,
12      pieceno => rec.piece#,
13      handle => rec.handle,
14      status => 'D'
15	 );
16   end loop;
17 end;
18 /

It took a while and caused again a lot of messages in both, the database and the ASM alert.log, but finally I was able to run RMAN commands successfully again.

Maybe this helps you solve such issues, but be aware of the fact that using DBMS_BACKUP_RESTORE is not supported.

DataPatch stuck on RAC – PSU October 2016

Yesterday one of my customers wanted to patch two 2-node clusters with the current PSU October 2016 (161018). Both are running 12.1.0.2 Grid Infrastructure and 12.1.0.2 Database. The servers run SPARC Solaris 10. When applying the patch on the first cluster using “opatchauto” everything went fine until the “trying to apply SQL Patch” part on the 2nd node. So I went to the log directory and found the following:

$ cd $ORACLE_BASE/cfgtoollogs/sqlpatch/sqlpatch_27075_2016_11_30_17_12_08
$ tail sqlpatch_catcon_0.log

SQL> GRANT SELECT ON sys.gv_$instance TO dv_secanalyst
  2  /

At that line it was stuck. Searching My Oracle Support brought up nothing helpful. So I had a look at the database sessions:

SQL> select sid, username, event, state, seconds_in_wait 
2    from v$session where username='SYS';

       SID USERNAME                       EVENT                                                            STATE                                                   SECONDS_IN_WAIT
---------- ------------------------------ ---------------------------------------------------------------- -----------                                    -------- ---------------
        13 SYS                            SQL*Net message from client                                      WAITING                                                             226
        30 SYS                            SQL*Net message from client                                      WAITING                                                             473
        32 SYS                            SQL*Net message to client                                        WAITED SHOR                                    T TIME                 0
       411 SYS                            SQL*Net message from client                                      WAITING                                                             473
       783 SYS                            library cache lock                                               WAITING                                                             211
       786 SYS                            SQL*Net message from client                                      WAITING                                                               4
      1155 SYS                            SQL*Net message from client                                      WAITING                                                             467

The session is waiting for something dictionary related. Since the waiting statement was related to RAC, I stopped the other instance which made sqlplatch continue immediately. So the workaround looked like this:

$ srvctl stop instance -db <dbname> -node <node1>
$ srvctl start instance -db <dbname> -node <node1>

This happened on both clusters. So be aware of that in case you are applying that PSU patch to RAC databases.
In case you missed to stop the 1st instance in time, the GRANT statement will run into a timeout (ORA-4021) and the SQL-Patch will be marked with “ERROR” in DBA_REGISTRY_SQLPATCH. In such case, just re-run “datapatch” again and monitor the logfile.
Happy patching.

Update 07-DEC-2016

I was not able to reproduce this issue on a Linux x86-64 system. So there is a chance that the issue is OS related.

Update 12-DEC-2016

Finally I reproduced this issue on my Linux x86-64 test system. Now I opened a SR for that.

Update 13-DEC-2016

Thanks to a quick and efficient Oracle Support guy (yes, there are such people!) we found the root cause of that issue. There is a bug in the Enterprise Manager Agent (DB Express maybe too) that it holds a shared lock on some GV$ views during the whole lifetime of a session. That’s why datapatch got stuck. If you just stop the Agent, datapatch will continue immediatly. There is no need to stop the whole instance. We just need to get rid of the Agent’s sessions.
Thanks a lot to Prakash from Oracle Support for his engagement in investigating this issue.

ASM Filter Driver CPU load – don’t care

Some time ago I wrote about ASM Filter Driver installation. If you are using AFD, then you might notice a permanent CPU load of 1.0 as we did. There was nothing else running, we stopped the Oracle Clusterware, stopped the Cloud Control Agent, still 1.0 load. Even after disabling the whole cluster stack and a reboot. But actually there were no processes visible that consumed CPU.

[root@vm101 ~]# crsctl disable crs
CRS-4621: Oracle High Availability Services autostart is disabled.

That’s what “top” said after reboot:

top - 20:44:51 up 4 min,  1 user,  load average: 0.00, 0.03, 0.02
Tasks: 108 total,   2 running, 106 sleeping,   0 stopped,   0 zombie
%Cpu(s):  0.0 us,  0.2 sy,  0.0 ni, 99.8 id,  0.0 wa,  0.0 hi,  0.0 si,  0.0 st
KiB Mem :  5889124 total,  5664764 free,   118360 used,   106000 buff/cache
KiB Swap:  6143996 total,  6143996 free,        0 used.  5718728 avail Mem

  PID USER      PR  NI    VIRT    RES    SHR S  %CPU %MEM     TIME+ COMMAND
 2291 root      20   0  129880   1676   1196 R   0.3  0.0   0:00.06 top
    1 root      20   0   54256   3968   2320 S   0.0  0.1   0:02.13 systemd
    2 root      20   0       0      0      0 S   0.0  0.0   0:00.00 kthreadd
    3 root      20   0       0      0      0 S   0.0  0.0   0:00.00 ksoftirqd/0

But when we loaded the AFD kernel driver, the load immediately went up to 1.0.

[root@vm101 ~]# lsmod |grep afd
[root@vm101 ~]# modprobe -r oracleafd
[root@vm101 ~]# lsmod |grep afd
oracleafd             205593  0

That’s what “top” told us now:

top - 20:52:20 up 12 min,  1 user,  load average: 1.06, 0.76, 0.37
Tasks: 104 total,   2 running, 102 sleeping,   0 stopped,   0 zombie
%Cpu(s):  0.1 us,  0.1 sy,  0.0 ni, 99.8 id,  0.0 wa,  0.0 hi,  0.0 si,  0.0 st
KiB Mem :  5889124 total,  5647164 free,   129004 used,   112956 buff/cache
KiB Swap:  6143996 total,  6143996 free,        0 used.  5707868 avail Mem

  PID USER      PR  NI    VIRT    RES    SHR S  %CPU %MEM     TIME+ COMMAND
    1 root      20   0   54256   3972   2320 S   0.0  0.1   0:02.14 systemd
    2 root      20   0       0      0      0 S   0.0  0.0   0:00.00 kthreadd

So a SR with Oracle was opened to clarify that. The explanation is quite simple. Linux counts processes in an uninterruptible wait in the load average, even though these processes don’t use any CPU. Those processes can be identified by the “D” state in ps -l output.

Let’s check the “D” state as Oracle Support mentioned:

[root@vm101 ~]# ps -efl | grep -E '^. D'
1 D root      2322     2  0  80   0 -     0 AfdgWa 20:45 ?        00:00:00 [afd_log]

You can see the “D” state in the second column. So that’s it. Don’t care about the load. It does not tell the truth.

And many thanks to my collegue for investigating this issue.

Using ASM Filter Driver right from the beginning

Preface

If you are running Oracle RAC, then configuring the shared storage is one of the main preinstallation tasks that needs to be done. You need to configure multipathing and make sure that the device name that will be used for ASM is always the same. And you must set permissions and ownership for these devices. On Linux you can use ASMlib for that. It stamps the devices so that it can identify them, provides an unique and consistent name for ASM and sets propper permissions for the devices. But it still possible for other processes to write to these devices, using “dd” for instance.

Now there is Oracle Grid Infrastructure 12c which introduces a replacement for ASMlib called ASM Filter Driver (AFD). Basically it does the same things as ASMlib but in addition to that it is able to block write operations from other processes than Oracle’s own ones.

So that is a good thing and I wanted to use it for a new cluster that I should set up. And that is where the trouble starts. Beside the fact that there were some bugs in the initial versions of AFD from which most got fixed by the April 2016 PSU, AFD is installed as part of Grid Infrastructure. You can read that in the Automatic Storage Management Docs. It states the following:

After installation of Oracle Grid Infrastructure, you can optionally configure Oracle ASMFD for your system.

What? After installation? But I need it right from the beginning to use it for my initial disk group. How about that? There is a MOS note How to Install ASM Filter Driver in a Linux Environment Without Having Previously Installed ASMLIB (Doc ID 2060259.1)  but this Whitepaper also asumes that Grid Infrastructure is already installed.

But as you can read from this blog posts title, there is a way to use AFD from scratch, but it is not really straight forward.

1. Install Grid Infrastructure Software

First step is to install Grid Infrastructure as a software only installation. That implies that you have to do it on all nodes that should form the future cluster. I did that on the first node, saved the response file and did a silent install on the other nodes.

[oracle@vm140 ~] ./runInstaller -silent -responseFile /home/oracle/stage/grid/grid.rsp -ignorePrereq

At the end of the installation you need to run the “orainstRoot.sh” script which itself provides two other root scripts which configure either a cluster or a stand alone server:

[root@vm140 ~]# /u01/app/oraInventory/orainstRoot.sh
Changing permissions of /u01/app/oraInventory.
Adding read,write permissions for group.
Removing read,write,execute permissions for world.

Changing groupname of /u01/app/oraInventory to oinstall.
The execution of the script is complete.
[root@vm140 ~]# /u01/app/12.1.0.2/grid/root.sh
Performing root user operation.

The following environment variables are set as:
	ORACLE_OWNER= oracle
	ORACLE_HOME=  /u01/app/12.1.0.2/grid

Enter the full pathname of the local bin directory: [/usr/local/bin]:
   Copying dbhome to /usr/local/bin ...
   Copying oraenv to /usr/local/bin ...
   Copying coraenv to /usr/local/bin ...


Creating /etc/oratab file...
Entries will be added to the /etc/oratab file as needed by
Database Configuration Assistant when a database is created
Finished running generic part of root script.
Now product-specific root actions will be performed.

To configure Grid Infrastructure for a Stand-Alone Server run the following command as the root user:
/u01/app/12.1.0.2/grid/perl/bin/perl -I/u01/app/12.1.0.2/grid/perl/lib -I/u01/app/12.1.0.2/grid/crs/install /u01/app/12.1.0.2/grid/crs/install/roothas.pl


To configure Grid Infrastructure for a Cluster execute the following command as oracle user:
/u01/app/12.1.0.2/grid/crs/config/config.sh
This command launches the Grid Infrastructure Configuration Wizard. The wizard also supports silent operation, and the parameters can be passed through the response file that is available in the installation media.

For the moment, we do not run any of these scripts.

2. Patching Grid Infrastructure software

Next step is to patch GI software to get the latest version for AFD. Simply update OPatch on all nodes and use “opatchauto” to patch GI home. You need to specify the ORACLE_HOME path using “-oh” parameter to patch an unconfigured Grid Infrastructure home.

[root@vm140 ~]# export ORACLE_HOME=/u01/app/12.1.0.2/grid
[root@vm140 ~]# export PATH=$ORACLE_HOME/OPatch:$PATH
[root@vm140 ~]# opatch version
OPatch Version: 12.1.0.1.12

OPatch succeeded.

[root@vm140 ~]# opatchauto apply /home/oracle/stage/22646084 -oh $ORACLE_HOME

[...]

--------------------------------Summary--------------------------------

Patching is completed successfully. Please find the summary as follows:

Host:vm140
CRS Home:/u01/app/12.1.0.2/grid
Summary:

==Following patches were SUCCESSFULLY applied:

Patch: /home/oracle/stage/22646084/21436941
Log: /u01/app/12.1.0.2/grid/cfgtoollogs/opatchauto/core/opatch/opatch2016-06-10_13-54-11PM_1.log

Patch: /home/oracle/stage/22646084/22291127
Log: /u01/app/12.1.0.2/grid/cfgtoollogs/opatchauto/core/opatch/opatch2016-06-10_13-54-11PM_1.log

Patch: /home/oracle/stage/22646084/22502518
Log: /u01/app/12.1.0.2/grid/cfgtoollogs/opatchauto/core/opatch/opatch2016-06-10_13-54-11PM_1.log

Patch: /home/oracle/stage/22646084/22502555
Log: /u01/app/12.1.0.2/grid/cfgtoollogs/opatchauto/core/opatch/opatch2016-06-10_13-54-11PM_1.log


OPatchAuto successful.

You see that with the latest OPatch version there is no need to create an ocm.rsp resopnse file anymore.

3. Configure Restart

Configure Restart? Why? Because it sets up everything we need to use AFD but does not need any shared storage or other cluster related things like virtual IPs, SCANs and so on.
Therefore you use the script that was provided earlier by the “orainstRoot.sh” script. Do that on all nodes of the future cluster.

[root@vm140 ~]# /u01/app/12.1.0.2/grid/perl/bin/perl -I/u01/app/12.1.0.2/grid/perl/lib -I/u01/app/12.1.0.2/grid/crs/install /u01/app/12.1.0.2/grid/crs/install/roothas.pl

4. Deconfigure Restart

After Restart was configured, you can deconfigure it right away. Everything that is needed for AFD is being kept. The documentation for that is here.

[root@vm140 ~]# cd /u01/app/12.1.0.2/grid/crs/install/
[root@vm140 install]# ./roothas.sh -deconfig -force

5. Confiure ASM Filter Driver

Now you can finally start configuring AFD. The whitepaper from the MOS note mentioned at the beginning provides a good overview of what has to be done. Simply connect as “root”, set the environment and run the following:

[root@vm140 install]# $ORACLE_HOME/bin/asmcmd afd_configure
Connected to an idle instance.
AFD-627: AFD distribution files found.
AFD-636: Installing requested AFD software.
AFD-637: Loading installed AFD drivers.
AFD-9321: Creating udev for AFD.
AFD-9323: Creating module dependencies - this may take some time.
AFD-9154: Loading 'oracleafd.ko' driver.
AFD-649: Verifying AFD devices.
AFD-9156: Detecting control device '/dev/oracleafd/admin'.
AFD-638: AFD installation correctness verified.
Modifying resource dependencies - this may take some time.
ASMCMD-9524: AFD configuration failed 'ERROR: OHASD start failed'
[root@vm140 install]# $ORACLE_HOME/bin/asmcmd afd_state
Connected to an idle instance.
ASMCMD-9526: The AFD state is 'LOADED' and filtering is 'DISABLED' on host 'vm140'

Don’t care about the error and the message that is telling it failed. That is simply because there is no cluster at all at the moment.
As a final configuration step you need to set the discovery string for AFD so that it can find the disks you want to use. This is defined inside “/etc/afd.conf”:

[root@vm140 install]# cat /etc/afd.conf
afd_diskstring='/dev/xvd*'

The above steps need to be done on all servers of the future cluster.
Now that AFD is configured, you can start labeling your disks. Do this on only one node:

[root@vm140 install]# $ORACLE_HOME/bin/asmcmd afd_label GI /dev/xvdb1
Connected to an idle instance.
[root@vm140 install]# $ORACLE_HOME/bin/asmcmd afd_label DATA /dev/xvdc1
Connected to an idle instance.
[root@vm140 install]# $ORACLE_HOME/bin/asmcmd afd_label FRA /dev/xvdd1
Connected to an idle instance.

[root@vm140 install]# $ORACLE_HOME/bin/asmcmd afd_lsdsk
Connected to an idle instance.
--------------------------------------------------------------------------------
Label                     Filtering   Path
================================================================================
GI                         DISABLED   /dev/xvdb1
DATA                       DISABLED   /dev/xvdc1
FRA                        DISABLED   /dev/xvdd1

On all the other nodes just do a rescan of the disks:

[root@vm141 install]# $ORACLE_HOME/bin/asmcmd afd_scan
Connected to an idle instance.
[root@vm141 install]# $ORACLE_HOME/bin/asmcmd afd_lsdsk
Connected to an idle instance.
--------------------------------------------------------------------------------
Label                     Filtering   Path
================================================================================
GI                         DISABLED   /dev/xvdb1
DATA                       DISABLED   /dev/xvdc1
FRA                        DISABLED   /dev/xvdd1

That’s it.

6. Configure cluster with AFD

Finally, you can start configuring your new cluster and use AFD disks right from the beginning. You can now use the Cluster Configuration Assistant that was mentioned by “orainstRoot.sh” to set up your cluster.

[oracle@vm140 ~]$ /u01/app/12.1.0.2/grid/crs/config/config.sh

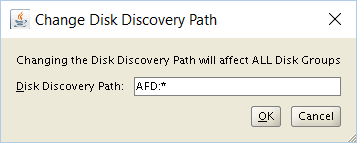
Follow the steps and you will see the well-known screens for setting up a cluster. At the point when you define the initial Grid Inftrastructure diskgroup you can now specify the “Discovery String”:

And, voila, you see the previously labeled disks:

And after you run the root scripts on all nodes, you’ll get a running cluster:

[root@vm140 bin]# ./crsctl stat res -t
--------------------------------------------------------------------------------
Name           Target  State        Server                   State details
--------------------------------------------------------------------------------
Local Resources
--------------------------------------------------------------------------------
ora.ASMNET1LSNR_ASM.lsnr
			   ONLINE  ONLINE       vm140                    STABLE
			   ONLINE  ONLINE       vm141                    STABLE
			   ONLINE  ONLINE       vm142                    STABLE
			   ONLINE  ONLINE       vm143                    STABLE
ora.GI.dg
			   ONLINE  ONLINE       vm140                    STABLE
			   ONLINE  ONLINE       vm141                    STABLE
			   ONLINE  ONLINE       vm142                    STABLE
			   OFFLINE OFFLINE      vm143                    STABLE
ora.LISTENER.lsnr
			   ONLINE  ONLINE       vm140                    STABLE
			   ONLINE  ONLINE       vm141                    STABLE
			   ONLINE  ONLINE       vm142                    STABLE
			   ONLINE  ONLINE       vm143                    STABLE
ora.net1.network
			   ONLINE  ONLINE       vm140                    STABLE
			   ONLINE  ONLINE       vm141                    STABLE
			   ONLINE  ONLINE       vm142                    STABLE
			   ONLINE  ONLINE       vm143                    STABLE
ora.ons
			   ONLINE  ONLINE       vm140                    STABLE
			   ONLINE  ONLINE       vm141                    STABLE
			   ONLINE  ONLINE       vm142                    STABLE
			   ONLINE  ONLINE       vm143                    STABLE
--------------------------------------------------------------------------------
Cluster Resources
--------------------------------------------------------------------------------
ora.LISTENER_SCAN1.lsnr
	  1        ONLINE  ONLINE       vm140                    STABLE
ora.MGMTLSNR
	  1        ONLINE  ONLINE       vm140                    169.254.231.166 192.
															 168.1.1,STABLE
ora.asm
	  1        ONLINE  ONLINE       vm140                    Started,STABLE
	  2        ONLINE  ONLINE       vm142                    Started,STABLE
	  3        ONLINE  ONLINE       vm141                    Started,STABLE
ora.cvu
	  1        ONLINE  ONLINE       vm140                    STABLE
ora.mgmtdb
	  1        ONLINE  ONLINE       vm140                    Open,STABLE
ora.oc4j
	  1        ONLINE  ONLINE       vm140                    STABLE
ora.scan1.vip
	  1        ONLINE  ONLINE       vm140                    STABLE
ora.vm140.vip
	  1        ONLINE  ONLINE       vm140                    STABLE
ora.vm141.vip
	  1        ONLINE  ONLINE       vm141                    STABLE
ora.vm142.vip
	  1        ONLINE  ONLINE       vm142                    STABLE
ora.vm143.vip
	  1        ONLINE  ONLINE       vm143                    STABLE
--------------------------------------------------------------------------------

And that’s it. Nothing more to do. Beside creating more disk groups and setting up databases. But that is simple compared to what we’ve done till now.

opatchauto Odyssey

A couple of days ago a customer asked for assistance in installing the January PSU in their RAC environment. The patch should be applied to two systems, first the test cluster, second the production cluster. Makes sense so far. So we planned the steps that needed to be done:

  • Download the patch
  • copy patch to all nodes and extract it
  • check OPatch version
  • create response file for OCM and copy it to all nodes
  • clear ASM adump directory since this may slow down pre-patch steps
  • “opatchauto” first node
  • “opatchauto” second node
  • run “datapatch” to apply SQL to databases

The whole procedure went fine without any issues on test. We even skipped the last step, running “datapatch” since the “opatchauto” did that for us. This happens in contrast to the Readme which does not tell about that.

So that was easy. But unfortunately the production system went not as smooth as the test system. “opatchauto” shut down the cluster stack and patched the RDBMS home successfully. But during the patch phase of GI, the logfile told us that there are still processes that blocked some files. I checked that and found a handful, one of those processes was the “ocssd”. When killing all the left-over processes I knew immediately that this was not the best idea. The server fenced and rebooted straight away. That left my cluster in a fuzzy state. The cluster stack came up again, but “opatchauto -resume” told me, that I should proceed with some manual steps. So I applied the patches to the GI home which was not done before and run the post-patch script which failed. Starting “opatchauto” in normal mode failed also since the cluster was already in “rolling” mode.

So finally I removed all the applied patches manually, put the cluster back in normal mode following MOS Note 1943498.1 and started the whole patching all over.  Everything went fine this time.

Conclusion

  1. Think before you act. Killing OCSSD is not a good idea at all.
  2. In contrast to the Readme “datapatch” is being executed by “opatchauto” as part of the patching process.
  3. Checking the current cluster status can be done like this:
[oracle@vm101 ~]$ crsctl query crs activeversion -f
Oracle Clusterware active version on the cluster is [12.1.0.2.0]. The cluster upgrade state is [NORMAL]. The cluster active patch level is [3467666221].


Shared Pool Memory Leak in 12c RAC

A couple of minutes ago I wrote about Parse Times in 12c. When investigating this issue we came across another one. The shared pool was growing and growing, stealing a lot of memory from the buffer cache. We stopped that by setting a minimum size for “db_cache_size” to stop shrinking the buffer cache. It is not that there isn’t enough memory, the MEMORY_TARGET was set to 42GB (the magic number). But the shared pool was consuming more than 20GB of that memory. We stopped the buffer cache from shrinking more and more at around 8GB. Now the shared pool started to steal it’s memory from the PGA.
So we started to identify what area is consuming the memory inside the shared pool:

SQL> select * from (
  2  select name, bytes from v$sgastat where pool ='shared pool' order by 2 desc
  3  )
  4  where rownum <11;

NAME                                      BYTES
-------------------------- --------------------
ges enqueues                      5.981.720.032
ges resource dynamic              5.568.662.280
value block free list             2.283.277.296
ges resource dynamic              1.799.279.656
free memory                         983.839.992
gcs resources                       696.864.960
SQLA                                534.089.824
KGH: NO ACCESS                      399.729.056
gcs shadows                         387.147.200
KGLH0                               268.811.064

Ok, ges things… A quick search in My Oracle Support revealed a bug which exactly met our findings ORA-04031 Errors Occurring with High “ges resource dynamic” & “ges enqueues” Memory Usage In The Shared Pool.

The workaround mentioned in the document helped, now the shared pool is quiet again.

Utilizing Serverpools in Oracle Grid Infrastructure

Introduction

The idea of serverpools was introduced in 11g already. Before the existence of serverpools the instances of a database needed to be hard-linked to a server. Asume a 4-node cluster and a 2-instance RAC-database configured to run on node-1 and node-2. If these two nodes are not running for whatever reason the RAC-database is entirely unavailable. We would need to reconfigure the database instances to run on the remaining nodes node-3 and node-4.
That is the moment were serverpools come into play. Serverpools are a kind of an abstraction layer between servers and instances. Servers are allocated to serverpools according to the rules we can define. And on the other hand databases (better: services) are configured to run on specific serverpools. There is no hard dependency between instances and servers anymore.
The following examples use the new 12c parameters since the short ones are now deprecated.

How it works – Basics

Assume the following environment:

  • 2 databases, one with “gold” service, one with “silver” service.
  • 4 servers in the cluster

We want to make sure, that the “gold” database is available as long as possible. So we create two serverpools for the two service levels.

srvctl add serverpool -serverpool gold   -min 1 -max 2 -importance 10
srvctl add serverpool -serverpool silver -min 1 -max 2 -importance 8

Now, make the databases/services use the newly created serverpools:

srvctl add service -db gold   -service goldsvc   -serverpool gold   -cardinality uniform
srvctl add service -db silver -service silversvc -serverpool silver -cardinality uniform

What happens at the startup of the whole cluster? Servers are assigned to serverpools in order of importance. First all serverpools are filled until the defined minimum is reached. If all serverpools have “min” server assigned, the serverpools get filled with servers until “max” is reached in order of importance. That means the serverpool with the highest importance is started first regardless which nodes comes up first. Look at this example:

  • node-4 comes up –> assigned to serverpool “gold” (highest importance, “min” not reached)
  • node-2 comes up –> assigned to serverpool “silver” (“gold” has reached “min”, “silver” has second-highest importance and “min” not reached)
  • node-1 comes up –> assigned to serverpool “gold” (“silver” (all serverpools) has reached “min”, “gold” has not reached “max” and has highest importance)
  • node-3 comes up –> assigned to serverpool “silver” (“gold” has reached “max”, “silver” has second-highest importance and “max” not reached)

The result looks like this:

$ srvctl status serverpool
Server pool name: Free
Active servers count: 0
Server pool name: Generic
Active servers count: 4
Server pool name: gold
Active servers count: 2
Server pool name: silver
Active servers count: 2
$ crsctl status srvpool
NAME=Free
ACTIVE_SERVERS=

NAME=Generic
ACTIVE_SERVERS=node-4 node-2 node-1 node-3

NAME=ora.gold
ACTIVE_SERVERS=node-4 node-1

NAME=ora.silver
ACTIVE_SERVERS=node-2 node-3

The instances were automatically started on the servers belonging to the configured serverpool. This happens completely automatic.

$ srvctl status database -db gold
Instance gold1 is running on node node-4
Instance gold2 is running on node node-1
$ srvctl status database -db silver
Instance silver1 is running on node node-2
Instance silver2 is running on node node-3

You can even modify the serverpool configuration, the handling of the database instances is done by the clusterware, there is no need for human intervention. As we add or remove servers from serverpools instances are configured and started or stopped automatically.

$ srvctl modify serverpool -serverpool gold   -max 3
$ srvctl modify serverpool -serverpool silver -max 1

We need to modify the “min” of serverpool “silver” too, obviously the rules are not completely re-evaluated after the changes.

$ srvctl status database -db gold
Instance gold1 is running on node node-4
Instance gold2 is running on node node-1
Instance gold3 is running on node node-3
$ srvctl status database -db silver
Instance silver1 is running on node node-2

See, there is a third instance for database “gold” now since the serverpool was extended to use three nodes.

Conclusion

Serverpools provide an easy way to get rid of the dependency between servers and instances which increases the availability and flexibility and also reduces administrative overhead dramatically due to the automatic instance handling.
But, on the other hand, if using Cloud Control to manage the cluster, there are some caveats. As of now Cloud Control is not aware of policy managed databases. If an instance is started on another node as at was before, it is marked as “down” on the old node. The newly assigned node does not know anything about the new instance from a Cloud Control point of view. This requires manual activity to reflect the changes and make everything “green” again.

There are other nice features around that, I will blog about that in the near future. Stay tuned.

Oracle Grid Infrastructure 12.1.0.2 on Windows caveats

Recently I needed to set up a two-node RAC cluster on Windows 2012 at a customers site. Therefore we picked the latest and greatest available version for that, which is 12.1.0.2 as of now. Since this is not my first cluster on Windows I took my checklist and went through all the prerequisites, renamed network interfaces, disabled automatic DNS registration, changed the bind order, created partitions, things like that.

So I continued to run through all those steps in the installer and finally the prerequisites check told me that the so called “Automatic Metric” value for the public and interconnect network is the same while it should not. This Automatic Metric feature was introduced with Windows 2012 and does a kind of automatic ordering of network interfaces depending on their speed. And since our public network was only 1GBit in contrast to the interconnect network having 4GBit it was put behind the interconnect network. That’s why the documentation (http://docs.oracle.com/database/121/CWWIN/networks.htm#CIHJFCGC) tells us to disable this feature and do the ordering manually which we then did.

Now that all prerequisites checks were successful the installer started to do all the work. Until the creation of the Container Database for the Oracle Grid Infrastructure Management Repository…. You know, that’s this new management database which was optional in 12.1.0.1 and became mandatory with 12.1.0.2. That means there is no way around this database. A quick research in MOS and the web gave no useful hints. That’s why I started to walk through the logfiles. Finally I came to the dbca log for the Management Database at “D:\app\oracle\cfgtoollogs\dbca\_mgmtdb\trace.log”:

[CRSNative.genericStartResource:313]  Failed to start resource: Name: ora.mgmtdb, node: myracnode01, filter: null, msg CRS-5020: Not all endpoints are registered for listener MGMTLSNR
CRS-2674: Start of 'ora.MGMTLSNR' on 'myracnode01' failed
[Thread-24] [ 2015-02-27 10:36:10.649 CET ] [HADatabaseUtils.start:1244]  Error starting mgmt database in local node, PRCR-1013 : Failed to start resource ora.mgmtdb
PRCR-1064 : Failed to start resource ora.mgmtdb on node myracnode01
CRS-5020: Not all endpoints are registered for listener MGMTLSNR
CRS-2674: Start of 'ora.MGMTLSNR' on 'myracnode01' failed

Ok, the management listener has some issues, it can’t register all it’s endpoints? Why is that?

C:\Windows\system32> crsctl stat res -t
--------------------------------------------------------------------------------
Name           Target  State        Server                   State details
--------------------------------------------------------------------------------
Local Resources
--------------------------------------------------------------------------------
ora.ASMNET1LSNR_ASM.lsnr
               ONLINE  ONLINE       myracnode01              STABLE
               ONLINE  ONLINE       myracnode02              STABLE
ora.GIMGMT.dg
               ONLINE  ONLINE       myracnode01              STABLE
               ONLINE  ONLINE       myracnode02              STABLE
ora.LISTENER.lsnr
               ONLINE  ONLINE       myracnode01              STABLE
               ONLINE  ONLINE       myracnode02              STABLE
ora.net1.network
               ONLINE  ONLINE       myracnode01              STABLE
               ONLINE  ONLINE       myracnode02              STABLE
ora.ons
               ONLINE  ONLINE       myracnode01              STABLE
               ONLINE  ONLINE       myracnode02              STABLE
--------------------------------------------------------------------------------
Cluster Resources
--------------------------------------------------------------------------------
ora.LISTENER_SCAN1.lsnr
      1        ONLINE  ONLINE       myracnode02              STABLE
ora.LISTENER_SCAN2.lsnr
      1        ONLINE  ONLINE       myracnode01              STABLE
ora.LISTENER_SCAN3.lsnr
      1        ONLINE  ONLINE       myracnode01              STABLE
ora.MGMTLSNR
      1        ONLINE  INTERMEDIATE myracnode01              Not All Endpoints Re
                                                             gistered 192.168.50.
                                                             33 192.168.50.34,STA
                                                             BLE
ora.asm
      1        ONLINE  ONLINE       myracnode01              Started,STABLE
      2        ONLINE  ONLINE       myracnode02              Started,STABLE
      3        OFFLINE OFFLINE                               STABLE
ora.cvu
      1        ONLINE  ONLINE       myracnode01              STABLE
ora.oc4j
      1        ONLINE  ONLINE       myracnode01              STABLE
ora.scan1.vip
      1        ONLINE  ONLINE       myracnode02              STABLE
ora.scan2.vip
      1        ONLINE  ONLINE       myracnode01              STABLE
ora.scan3.vip
      1        ONLINE  ONLINE       myracnode01              STABLE
ora.myracnode01.vip
      1        ONLINE  ONLINE       myracnode01              STABLE
ora.myracnode02.vip
      1        ONLINE  ONLINE       myracnode02              STABLE
--------------------------------------------------------------------------------

Let’s look into the listener configuration:

C:\Windows\system32> srvctl config mgmtlsnr
Name: MGMTLSNR
Type: Management Listener
Owner: nt authority\system
Home:
End points: TCP:1521
Management listener is enabled.
Management listener is individually enabled on nodes:
Management listener is individually disabled on nodes:

C:\Windows\system32> srvctl config listener
Name: LISTENER
Type: Database Listener
Network: 1, Owner: nt authority\system
Home:
End points: TCP:1521
Listener is enabled.
Listener is individually enabled on nodes:
Listener is individually disabled on nodes:

Look at that, both listeners use the same TCP port. That is not the case on Linux. On Linux the management listener uses port 1531. Should it be that easy? I tried it:

C:\Windows\system32> srvctl modify mgmtlsnr -endpoints TCP:1531
C:\Windows\system32> srvctl stop mgmtlsnr
C:\Windows\system32> srvctl start mgmtlsnr
C:\Windows\system32> srvctl config mgmtlsnr
Name: MGMTLSNR
Type: Management Listener
Owner: nt authority\system
Home:
End points: TCP:1531
Management listener is enabled.
Management listener is individually enabled on nodes:
Management listener is individually disabled on nodes:

Now the management listener is running on port 1531. A quick look at “crsctl stat res -t” showed no more issues:

--------------------------------------------------------------------------------
Cluster Resources
--------------------------------------------------------------------------------
ora.MGMTLSNR
      1        ONLINE  ONLINE       myracnode01              192.168.50.35 192.16
                                                             8.50.36,STABLE

Now I re-run the assistant and it went past that step without any errors. Easy fix, but not quite easy to find the cause of the issue.

Finally the installer came up with lots of green check marks:
installer-successful

I hope this helps all of you who need to cope with Oracle clusters on Windows.